Whilst I don’t do any car work for other people, I had this problem with the Alfa and there seemed to be no information ‘out there’ on how to solve it, so the obvious thing is do it yourself and then document it. I used this video of a 156 lock for inspiration, but found that although it’s similar, you can’t use the same “poke a bit of wire in” trick on the 159.
For some reason the bonnet won’t open. I’ve checked the internal lever and cable-pull mechanism inside the car, nothing wrong there. Some people suggest having an assistant press down on the bonnet while the internal lever is pulled, that didn’t work either. I can see the reasoning behind this suggestion, because it reduces the friction between two potentially corroded/rusty/rough parts, allowing the main latch to unlock easier. It didn’t work for me though.
Although my problem was caused by corrosion and a lack of lubrication inside the lock, this will also work if your cable has snapped.
So I’ve tried the easy things, but nothing is working. After weeks of not using the car it won’t start because the battery is flat, so taking it to the garage isn’t an option. Let’s get into the mechanism and see what’s going on!
Two things need to happen – The small centre grille needs to come off so that we have better access, and we need to unbolt the lock so we can get to it’s internal moving parts. We’ll start with the lock first as it makes the grill removal a bit easier.
STEP 1 – Unbolting the lock
There are 3 x M10 nuts holding the lock onto the bodywork. The central one is reasonably accessible behind/below the Alfa badge, the other 2 will need either a ring spanner with a suitable amout of ‘bend’ at the end, or a small enough socket + universal joint + extension bar to get into the limited space. I wouldn’t advise using an open-ended spanner because of potential damage to the nuts, they are fairly tight. All three nuts have bolts poking through the middle which stick out a fair way and I found 1/4″ mounting sockets done the job as they are deeper than 1/2″ ones.
I first imagined that it might be possible to raise the lock and bonnet in one piece at this point, but the lock is bigger than the access hole, so just forget that idea.
STEP 2 – Removing the grille
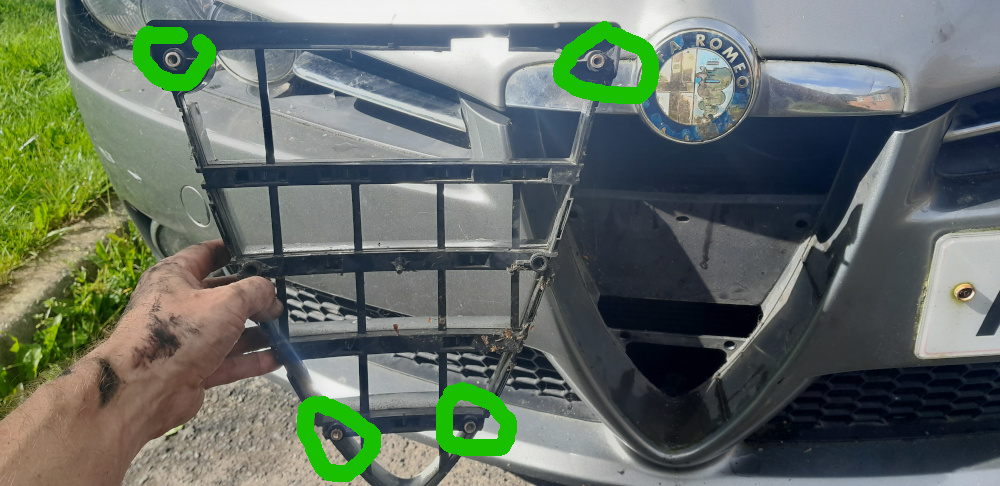
I’ve seen people saying that removing the small grill is only possible by removing the whole bumper, but we can’t do that because the top screws are only accessible when the bonnet is open!
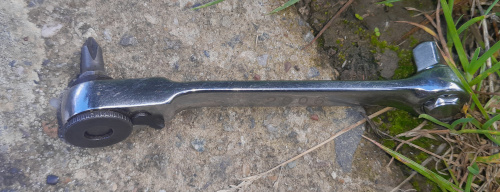
I had to snap out 3 of the vertical grille pieces at the top of the grille to be able to get access to the top 2 screws, but don’t worry as they can be glued back later on. To reach the screws I used a small ratchet wrench, pressing the bit into the screw head with one hand and rotating the ratchet arm with the other hand. The wrench I have has a knurled knob which makes for faster progress once the screw is started. If you don’t have one of these then a right-angled screwdriver might work, but you may be there some time.
The lower two screws can be accessed by pushing up on the black plastic tray underneath the radiator. I’ve seen that replacement grilles have 6 screws, but mine only had 4 for some reason
STEP 3 – Unlocking
You should now be able to reach in and pull the lock towards yourself, just enough to carefully get a finger behind and into the mechanism.
What you’re trying to do, is to reach behind the lock and pull the lever across (left to right) as if mimicking the cable being pulled (see direction of purple arrow). Note that the piece arrowed in blue will violently spring upwards (well, ok, so on my photo it will spring to the right), and the big spring in the middle will get shorter. Make sure your hands are out of the way of that lot! Hopefully there was a clunk, so now you can use the plastic lever to fully unlock the catch and open the bonnet.
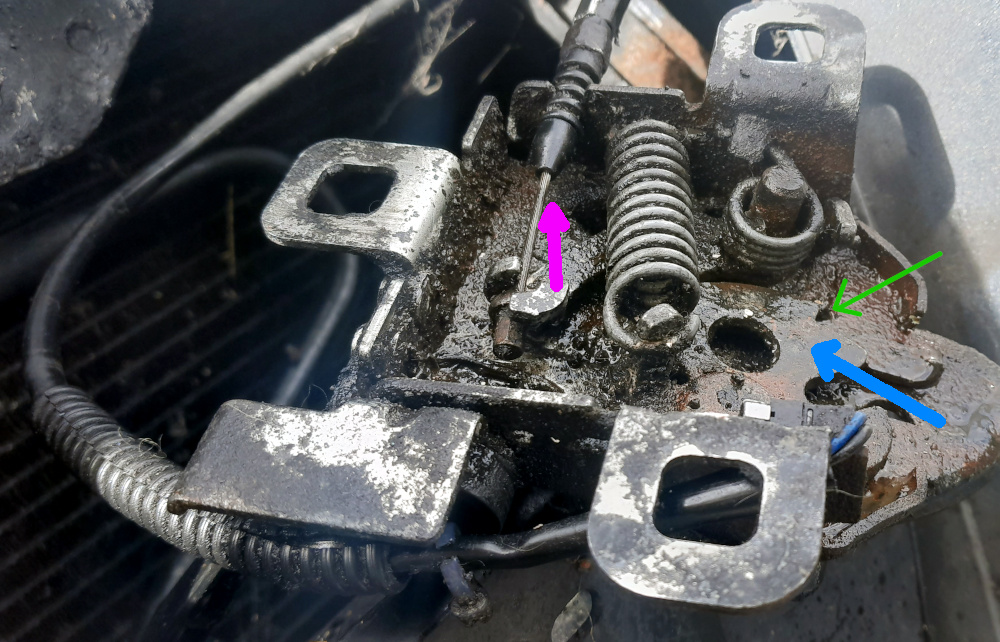
Give everything a good clean and lubricate with grease. I found the blue-arrowed part to be quite stiff at first. The meeting surfaces of those two metal levers could do with some grease, as it’s the point of contact between these two pieces of metal (which are held tightly together with a spring) which you’re sliding against each other when you pull the bonnet release handle; the more easily these slide the easier the bonnet will be to open in the future. The ‘catch’ is arrowed here in green.
Reassembly
Start by refitting the lock to the bodywork with the three M10 nuts, doing them up finger-tight only to start with. Take care to route the wiring so that it’s not damaged (This is the “bonnet open” sensor switch by the way). Note that the oversize holes on the lock mechanism allow for some vertical and horizontal adjustment of the lock, so that it lines up nicely with the bonnet. On mine I could see exactly where the plate was previously mounted because the un-exposed metal was shiny and the surrounding metal was dull, but you may need to align things by trial and error and in fact I did move mine slightly to the left to get perfect alignment. Take your time here! The metal ‘eye’ of the bonnet needs to nicely line up with the main slot, you can lower the catch down into the lock to see if it scrapes on the sides, but don’t fully lock the bonnet just yet.
Once you think you have things in the right place, tighten the three nuts fully. Don’t be tempted to lower the bonnet yet, but instead close the main latch (see blue arrow in photo) using a screwdriver or metal rod, as if to mimic the metal ‘eye’ of the bonnet coming downwards. You’ll need to use quite some force to do this as the internal spring is strong, but just keep pressing down until the lock clicks shut. Check that the bonnet release lever inside the car works reliably.
It’s worth mentioning there are several grooves running around the outside of the release-cable (see photo), and you can mount the outer cable onto the lock body using any one of these grooves. I chose to move mine so that the cable outer was 1 groove to the right relative to how it looked to start with (to make the wire a bit tighter), but if you’re in any doubt whatsoever then just use the same groove as before.
Once you’re happy that the mechanism opens when you pull the internal handle, then you can try lowering and locking the bonnet. If the bonnet isn’t quite lining up correctly with the lock then loosen the three nuts and make the necessary adjustments. Tighten the bolts and re-test.
Finally, refit the grille with the four screws (or six if yours had six!)
As mentioned earlier, the plastic pieces which you snapped off the grille earlier can now be glued back in place. You’ll want to offer up the pieces first (before gluing) to check which position each of the three [or more!] pieces fits into, and which way up they should go. I used 2-part epoxy resin, with a cable tie glued behind each of the struts just to add a bit more strength.
Final thoughts…
The guy who made the video on the 156 lock (see top of page) showed us that there’s a hole in the side of the 156 lock, which allows a piece of wire to be inserted and the lock undone without any of the faffing around that we’ve just done. The main problem is that the 159’s side grilles don’t have any spaces through which to push things, and secondly the hole that does exist in the side of the 159’s lock is really tiny (it’s on the left side of the lock), and even if you can feel where it is it would be really difficult to align your pin with the internal lever and successfully open the lock. Another thing I noticed was that there’s a slot in the front surface of the lock, around about the 7-o’clock position, I wondered if it was possible to slip something in there and nudge the lever across. But you’d still need good access to the whole area so this isn’t really workable.
Also, don’t be tempted to remove the badge and chromed badge mounting to get better access! Yes there is a screw head which looks like it might undo something, but what you can’t see are two other screws further back holding that assembly in place which you definitely won’t be able to reach.
On reflection it’s best to break the lock apart, clean and grease everything and be knowledgeable that you’ve actually fixed something.